When I was a kid, I always wanted a website. I would explore the internet and find these DIY-esque websites. Something about them really made me want to make one, and then I found out it costs money, so I backed away from it because I only had so much allowance. Now I’m roughly 12 years older and know a lot more about the internet and have the money I didn’t have when I was a kid.
So, over the summer, I got sent a link, and it was for a listing that was selling mini desktops for $60 a pop in a town nearby. I went through the specs, did some deep dives, and while it’s older hardware, it was a good match for what I wanted to set up. My friend set a time and date to buy these computers, and a 3-hour car ride later, they were ours. Like I said, the hardware is older, but it’s got an Intel i5-6500T CPU clocked at 2.5GHz, 8 GB DDR4 RAM, and 500 GB of HDD Storage. Eventually, I plan to upgrade the RAM to 32 GB, but for now I’m holding off. I walked away with two of these minis and started my research.
The idea I started with was a machine or test environment where I could host containers and virtual machines, so I could learn the ins and outs of virtualization and eventually dabble in pen-testing. I wanted to try to host some services, maybe set up Plex or a personal Minecraft server. As I started my research, I eventually ran into Proxmox VE, which, in simple terms, is a virtualization platform that is made for the deployment of containers and Virtual Machines. It’s a Linux-based OS that is primarily accessed through a web-based UI. I started to research Proxmox and what my machines could do, and I went all in at first: Raspberry Pi router with Tailscale VPN, easy access to my Proxmox Nodes, clustering, and Cloudflare Tunnels! Needless to say, the more I researched, the more I realized I was actually way over my head. To even do some of the stuff I wanted to do, I would need to NOT live on campus. Within my college’s Residential Network Policy lies one (1) clause that kinda throws a wrench in my plans.
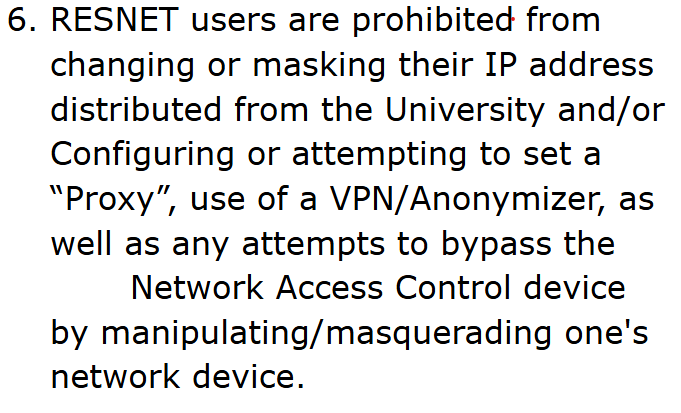
Within my college’s Residential Network Policy lies one (1) clause that kind of throws a wrench in my plans. I can’t have a VPN installed on my laptop, desktop, phone, etc, and I can’t set up a Proxy for Cloudflare. Well, great, that’s the first roadblock.
So with that information, I scaled back the project. The idea then formed into “ Can I at least access the UI for Proxmox outside of the network I set it up in?” Which, as it turns out, yes, I can. But how? Well, if I can’t set up the Cloudflare tunnel or VPN in my dorm, then I can set up the lab elsewhere. I convinced a friend of mine to let me take over a spot in their office for my homelab. With the home of the homelab secured, it was now time to actually get it running. I set a timer for roughly 25 days
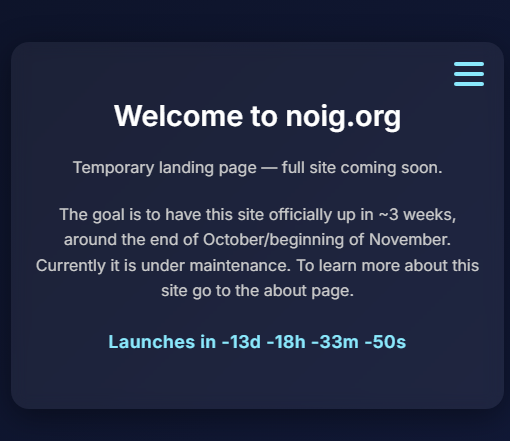
As you can see I did not make deadline.
where I have to get the homelab up and the services I want running to be completely accessible from outside my friend’s office. I spent the majority of the first 2 weeks researching and figuring out exactly how my homelab is going to function. I extensively researched setting up a website, self-hosting it with WordPress, getting used to using Cloudflare and its various services, and just being a college student in general. After the two weeks, I went back to my hometown, and within a weekend, I got Proxmox running on both of my mini desktops.
With Proxmox running, I started to focus on getting the web UI accessible outside the network of my house. Cloudflare actually has a pretty cool service that I’ve mentioned already, and it’s called Cloudflared. Using Cloudflared, I can tunnel into my homelab through a purchased domain that is registered to a Cloudflare account. Setting up the Cloudflare service isn’t hard either. I was able to download it through GitHub and set up the tunnel by following their documentation. I changed a couple of permissions, fixed some of their config files (added the correct ingress settings and websocket information) to make the traffic work, and made the tunnel automatically start upon reboot, and done! Cloudflared is set up and acts as a proxy for my homelab. Great! The next step was to move all of it to its permanent location because if I left it at home, it would be difficult for me to service it if something were to break. So I got back to campus, I went to my friend’s office, got everything plugged in, fixed the Cloudflared ingress IPs to match the correct ones, and it was time to start working on the site.
I haven’t really mentioned that I didn’t cluster the two minis. Mainly because I want them to be separate for now, and also, I really need three for a good cluster. With two, I run the risk of breaking quorum with the nodes. So not clustered, but I’m very glad I made two, as they can act as a backup to one another. Let’s say one goes down, or for some reason I can no longer access the web UI for one of my nodes, I simply go to the other UI and troubleshoot the problem from there. This allows me to do maintenance without having to physically be in the network or on-site for them. However, if both are down, I obviously can’t do anything, and then I would have to go in person and work on the problem. This idea has saved me several times during the process of getting all the settings, containers, and services running.
Anyways, for the site, I tried to use a Docker container to really get the full experience, but for some reason, I was never able to get the site working like that. WordPress would create successfully, the service would go online, but I wouldn’t see anything on the internet, even if I were in the same network. So, crap, something is deeply wrong, and I’m not sure. For the longest time, I thought maybe something with the database didn’t get initialized right. So I spent approximately 6 hours fixing the database, combing through Apache settings, and eventually, still nothing. At this point, I was rightfully annoyed with Docker, so within Proxmox, I completely wiped the container from the node and started over.
I avoided Docker this time and went straight to just working on WordPress without it, which meant that all steps that were automated with Docker are no longer automatic. Annoying, more than anything else, honestly. I follow the documentation and watch a few videos, and eventually, I’m greeted with my website. The solution that ultimately appeared is that, when creating a container (LXC) in Proxmox, you typically have to pick a template. That template is the operating system it will run on. I found a lot of templates available for containers, but hidden away in this list was a Turnkey distro for WordPress instances specifically. I download the template, make the container for my blog, follow the setup guide for it, and boom! Beautiful, glorious website! Alright, awesome, I made it right? Wrong, I can’t access my admin page. I check my admin credentials, and all of it is right. I check the database; it’s working. I check locally; it’s also working. But in my dorm or anywhere else in the world, I cannot access my admin page for the blog. At this point, I have a week left before I hit my self-imposed deadline, which is not great. I wanted to use this week to edit and make the website as clean as I could, but alas, debugging must always come first. Whatever, I still have a week, so I dedicate my weekend to fixing this admin page problem, and after about 4 hours on a Friday, I get it. I simply forgot one redirect for my website, some definition in a config file for WordPress, and all of a sudden, I have access to my blog.
I did it! I fixed my blog! From then on, I started to really dedicate some time to making a nice-looking site. I find a good theme, figure out a good editor plugin, and get to work. Making the site and learning the editor wasn’t hard; it just took some getting used to. The hardest thing I ended up having to set up was a contact form. I wanted a way for people to be able to contact me, but I was concerned about just putting up an email. This led me down a rabbit hole until I figured out you could make contact forms; all it required was a plugin and some email redirecting permissions that I had to set up within Cloudflare. The form gets made and embedded really quickly into the contact page. I tested the form and nothing came through, but in the Cloudflare analytics for redirected emails, I see that the one I sent didn’t go through because it wasn’t authenticated. Sure… fine. Little research later, I realize I need to set up a Mail Transfer Protocol that authenticates the emails being redirected. This was again solved pretty easily with a plugin with WordPress; however, because I wanted to use a specific email account for the redirected emails, I had to go down another rabbit hole. To get that authentication to actually go through, I had to hook up a Web app with Google Workspace to set up the Gmail Suite API. That way, when the email gets sent through the plugin from the address, it gets the certification that it needs, and then it gets redirected by Cloudflare to the correct email address.
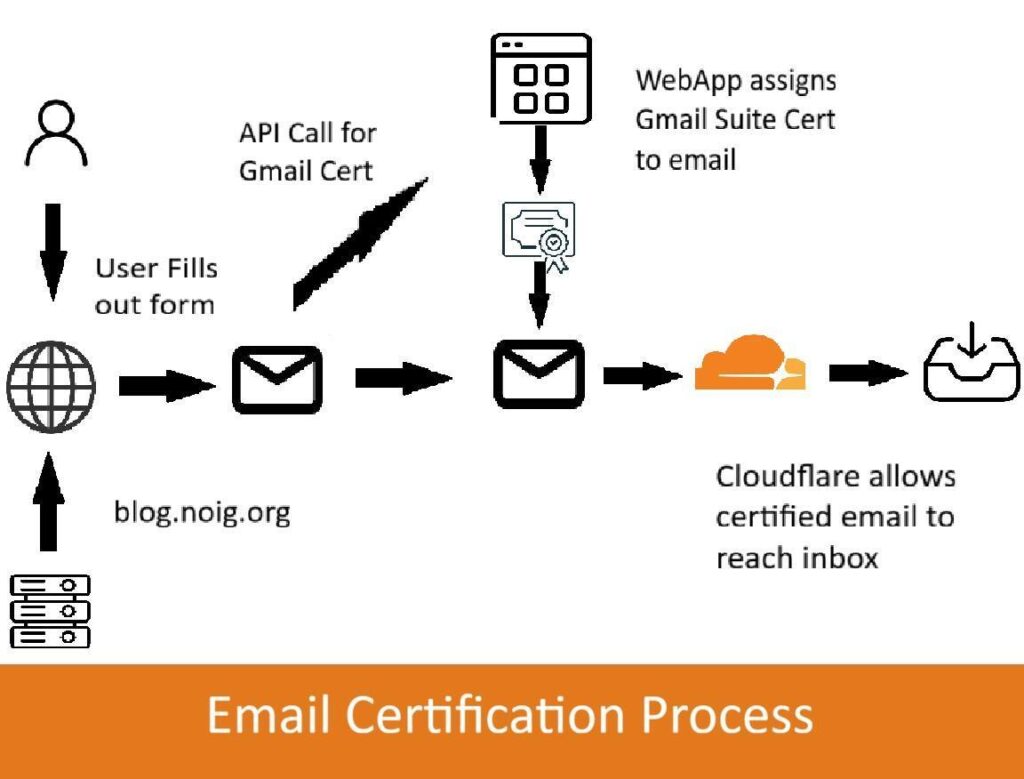
Honestly, it still confuses me a little, but it was a really fun thing to learn!
Overall, this was a cool project to work on, and I’m really happy with the experience and result. Going forward, I’m gonna probably end up writing shorter posts, but I wanted to detail the full experience of working on this and my deep dive into homelabbing. More personal projects will also be posted here, but this blog is going to act as a portfolio of all my projects and work with homelabbing and cybersecurity as a whole.
Oh, also, if you were wondering if I made my self-made deadline, the answer to that would be no. I most definitely did not. Here is proof of that.